We won’t sugarcoat it: dirty charger connectors can quietly raise resistance and heat, undermining reliability. We, as technicians and users alike, must approach cleaning and inspection with a disciplined checklist, proper PPE, and non-metallic tools. We’ll outline safe prep, corrosion indicators, and careful reseating plus re-measurement to prevent intermittent charging. If issues persist, it’s prudent to consider replacements or professional help. Keep momentum with us as we tackle the details that ensure consistent power delivery.
Key Takeaways
- Use dry brushes or low‑pressure compressed air to remove debris from USB-C, Lightning, barrel, and prong connectors, followed by isopropyl alcohol wipe if needed.
- Inspect for corrosion, bent pins, wear, and misalignment; document findings and replace components beyond tolerance.
- Ensure full seating with controlled pressure, proper latch engagement, and parallel contact during insertion.
- After cleaning, verify insulation integrity, absence of residue, and smooth mating without excessive force.
- Maintain records of cleaning cycles, torque specs, and replacement intervals for ongoing reliability.
Why Dirty Connectors Threaten Safe Charging
Dirty connectors can compromise charging safety in several ways. We observe that contamination alters contact quality, increasing resistance and heat generation during charging. This can reduce voltage delivery, trigger current spikes, and escalate thermal stress on terminals. Debris and corrosion corrode contact surfaces, creating voltage drops that interrupt power delivery and cycling efficiency. Inconsistent contact may cause intermittent charging, leading to false “safe charging” impressions while performance degrades. Mechanical misalignment from buildup can loosen connections, elevating arcing risk. Electrical insulation from dust or oxidation can mask warning signs, delaying intervention and elevating fault probability. To maintain safe charging, monitor for heat, unusual charging times, or fluctuating currents. If contaminants are detected, clean and reseat connectors promptly, and seek professional inspection when in doubt. Stay vigilant for warning signs.
Prep and Safety: What You Need Before Cleaning

To begin cleaning safely, we prepare a ready-to-use checklist and verify PPE, tools, and workspace before touching any charger connectors. Our prep safety focus ensures hazards are minimized and procedures stay consistent. We confirm rated PPE: eye protection, gloves, and non-conductive footwear, plus a fire extinguisher within reach. We review tool checklist items: insulated pliers, multimeter, non-metallic brush, and approved contact cleaner, verifying seals and zero exposure to live circuits. We clear the area of liquids, clutter, and conductive debris, then confirm grounding and circuit de-energization per policy. We document any AMCs or recent maintenance and annotate tasks for accountability. This disciplined pre-check prevents missteps, promotes safety, and stabilizes post-cleaning results, aligning with prep safety and ensuring reliable connector performance.
Identifying Corrosion and Wear Signs
We start by inspecting for corrosion and wear indicators as we proceed from our prep checks. We identify corrosion indicators by color changes, pitting, flaking, or powdery residues on terminals and plug surfaces. We note wear signs such as flattened contacts, bent pins, excessive play, and mating surface scoring. We assess continuity by gentle probing only if safe, avoiding force that could damage connectors. We compare matching halves for asymmetry or misalignment, and verify ferrite cores or shielding remain intact. We document corrosion indicators that reduce contact area or create resistance, and wear signs that degrade seating force or create intermittent connections. If any anomalies exceed thresholds, we flag components for cleaning limits or replacement, ensuring measurements align with manufacturer specifications and safety guidelines.
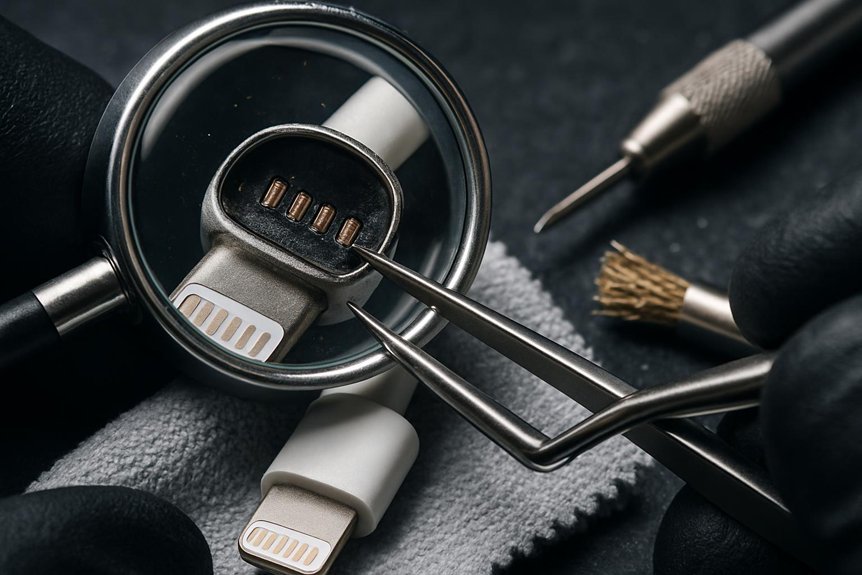
Cleaning USB-C and Lightning: Tips and Steps
When addressing USB-C and Lightning connectors, we begin with a cautious, methodical approach to prevent damage and ensure reliable charging and data transfer. We outline a step-by-step routine that minimizes abrasion and avoids liquid exposure. First, power down devices and unplug sources, then inspect for visible debris or corrosion. Use a dry, lint-free brush or compressed air at a low pressure to dislodge dust; never spray liquids directly. For stubborn grime, apply a cotton swab lightly dampened with isopropyl alcohol (90%+), then allow full evaporation before reuse. Wipe the exterior surfaces to remove fingerprints and oils, preserving engagement accuracy. Document wear and schedule periodic checks, reinforcing lightning care as part of routine maintenance. Always replace compromised cables to maintain peak performance.
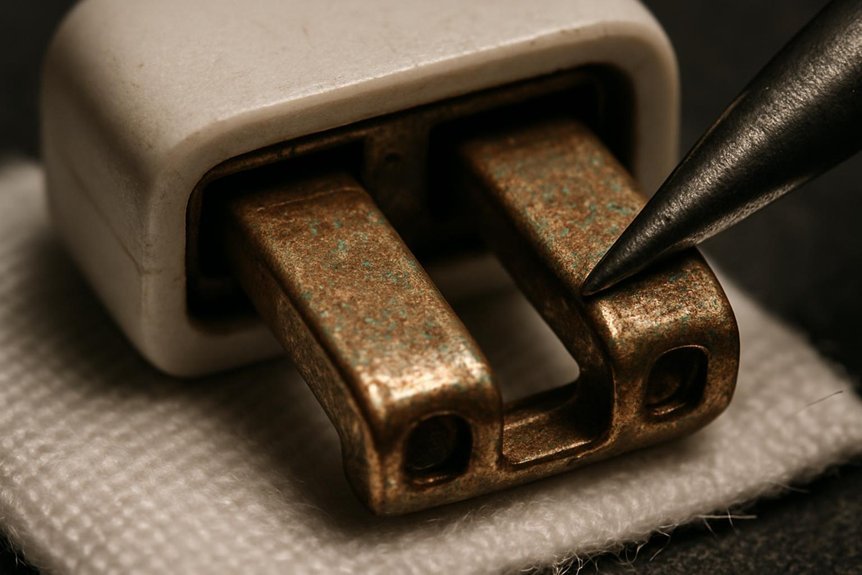
Cleaning Barrel and Prong Connectors Safely
What’s the best way to clean barrel and prong connectors without causing damage? We approach barrel cleaning first, using a microfiber cloth lightly dampened with isopropyl alcohol (70% maximum) and avoid excess moisture. Gently wipe the outer barrel surfaces, then dry with a separate, lint-free cloth. For prong safety, inspect prongs for bending, corrosion, or heat damage before cleaning. If needed, use a nondestructive plastic pick to remove debris, never metal tools that could gouge contacts. Refrain from applying solvents to the interior receptacle; instead, focus wipes along exposed surfaces only. Allow components to air-dry fully before reassembly. Maintain consistent pressure and avoid twisting prongs during cleaning. This ensures reliable electrical contact while minimizing wear over time. Barrel cleaning and prong safety remain essential steps in routine maintenance.
Quick Post-Cleaning Inspection: What to Check
After cleaning, perform a quick post-cleaning inspection to confirm integrity: check barrel and prong surfaces for residue, corrosion, or distortion, and verify there’s no remaining reachable debris. We proceed with a methodical check aligned to our cleaning cadence, ensuring consistency across sessions. Inspect contact areas for flatness and proper seating, noting any micro-scratches that may affect conductivity. Confirm insulation ends remain intact and free of ingress paths. Verify connectors mate smoothly without excessive force, and that there’s no looseness or wobble in any plug interface. Review the absence of discoloration or heat-affected discoloration on metal surfaces. Document findings in a concise inspection checklist, flagging items that require re-cleaning or replacement. Maintain records to support traceability and future maintenance planning.
What to Do About Bent or Damaged Pins
Bent or damaged pins require immediate, non-destructive mitigation to prevent further harm to the connector or equipment. We assess the extent of deformation using a magnified view and gentle tactile feedback, avoiding forceful probing. If pins show light bends, we guide them back toward alignment with minimal contact, using non-metallic tools and steady pressure, then recheck seating and continuity. If pins are visibly cracked, bent beyond straightening tolerance, or loosened from the contact tail, discontinue use and honor replacement procedures. Do not apply heat, solvents, or adhesives. Document the condition, timestamped, and label the connector as non-operational until repaired or replaced. After handling, perform a conservative functional check on mating components, ensuring no misalignment, arcing, or intermittent contact remains.
Troubleshooting Charging After Cleaning
We recheck the connector after cleaning to confirm no residue or misalignment affects contact. Then we verify charger alignment with the port to ensure proper seating and strand-free power transfer. If issues persist, we reassess the interface and re-verify connections to rule out intermittent faults.
Recheck After Cleaning
Once you’ve cleaned the connectors and terminals, recheck the charging setup by reconnecting the charger and testing for a steady current flow; if the charger still isn’t delivering power, inspect for any remaining debris, bent pins, or corrosion and verify the polarity and seating of every connection. We proceed with careful, methodical checks, confirming that each contact is fully engaged and aligned. If issues persist, reseat the connector halves, resecure all fasteners, and remeasure voltage with calibrated equipment. Document findings and apply care tips to prevent recurrence, such as gentle cleaning intervals and avoiding moisture exposure. Maintain safety reminders by powering down before inspections and using insulated tools. Finalize with a repeat test ensuring sustained current and stable charge across cycles, then proceed to the next verification step.
Verify Charger Alignment
How should we verify charger alignment after cleaning? We begin with a visual and mechanical check to ensure proper seating and contact. Inspect the connector face for uniform matement, flatness, and absence of burrs or debris that could create misalignment. Insert the plug fully with controlled pressure and observe whether the latch engages smoothly without binding. Verify that the alignment guides and pins register with their corresponding recesses in the receptacle, maintaining parallel contact. If resistance or crooked seating occurs, stop and re-clean, re-inspect, then reattempt. Document any signs of connector wear and note if alignment remains inconsistent after cleaning, as this may indicate degraded components. Prioritize verification alignment to prevent arcing, heat buildup, or intermittent charging failures.
Maintenance Habits to Extend Connector Life
We implement regular cleaning routines and strict terminal inspection protocols to prolong connector life. By adhering to consistent maintenance, we reduce corrosion risk and catch wear before it escalates. We’ll discuss best practices for timing, tools, and documentation so you can sustain reliable charging performance.
Regular Cleaning Routines
Regular cleaning routines keep charger connectors and terminals reliable and safe. We outline a practical approach we use to minimize corrosion and contact resistance, while preserving mating geometry. Establish a cleaning cadence based on usage, environment, and exposure to dust, moisture, or chemicals, then document it for consistency. We perform light, non-abrasive wiping with lint-free materials and isopropyl alcohol when applicable, avoiding excess liquid that could ingress seals or housings. Always dry thoroughly before reconnection. We rotate tasks to prevent complacency and verify cleanliness with a visual check and gentle probing only after drying. For storage, follow storage precautions: keep connectors capped or mated in controlled conditions, protect from contamination, and store away from extreme temperatures. This disciplined routine sustains reliable electrical contact and reduces inspection interventions.
Terminal Inspection Protocols
Are connectors and terminals genuinely reliable only when inspected routinely, or do subtle signs of wear creep in unnoticed? We approach terminal inspection protocols with a disciplined checklist, documenting every observation and action. Begin by verifying physical integrity: absence of cracks, corrosion, or deformation, then confirm pin alignment and contact spring tension meets defined tolerances. Use calibrated gauges to measure surface roughness and inspect for arcing damage or discoloration. Implement electrical tests only after visual confirmation, ensuring no latent faults remain. Maintain records of cleaning cycles, torque specs, and replacement intervals aligned to charging standards. Emphasize safety training for all personnel, outlining lockout/tagout procedures, proper PPE, and incident reporting. Close each session by validating that connectors meet reliability criteria and documenting corrective actions for traceability.
When to Replace Chargers or Seek Professional Help
Eventually, we should replace chargers or seek professional help when you notice persistent charging failures, melted connectors, exposed wires, or a burning odor. We act with clear criteria: replacement indicators, safety precautions, and professional thresholds. If repeated faults occur after cleaning frequency adjustments, replace the unit; if damage is beyond field repair, seek expert service. Do not delay when insulation is compromised or heat signatures appear. For safety, power down, unplug, and isolate the device before inspection. If suspected internal faults persist, contact the manufacturer or a licensed technician. Table below summarizes the decision framework.
If charging faults persist or damage appears, replace or seek professional help promptly to ensure safety.
| Condition | Action | Rationale |
|---|---|---|
| Persistent faults | Replace/inspect | Avoid performance risk |
| Visible damage | Replace | Safety prerequisite |
| Uncertain faults | Consult | Professional thresholds |
Frequently Asked Questions
How Often Should I Perform Routine Connector Cleaning?
We recommend cleaning frequency every 6 months as part of routine maintenance, unless signs of corrosion or debris appear sooner; we stay proactive, inspecting connectors and terminals, then perform targeted cleaning to maintain optimal performance and safety.
Can Cleaning Fluids Damage Electronic Devices?
Yes, cleaning fluids can cause electronic damage if misused. Imagine a drip on a motherboard: a tiny spill wrecks circuits. We advise using manufacturer-approved cleaners and avoid liquids near sensitive connectors to prevent damage.
What Tools Are Unsafe for Connector Cleaning?
Unsafe tools include abrasive cleaners and metal scrapers, tools that can scratch or corrode connectors. We warn readers: avoid electric-grade solvents and abrasive pads; these unsafe tools compromise insulation, coatings, and contact reliability. Stick to designated non-abrasive, electronics-safe cleaners.
Do Cleaning Tips Apply to All Charging Standards?
Charging standards vary, and cleaning applicability isn’t universal, so we state: some standards allow gentle cleaning, others prohibit it altogether; determine per standard, then proceed cautiously. We, readers, recommend verifying specifications before attempting any charging-connector cleaning.
How to Store Cleaned Connectors to Prevent Tarnish?
We store cleaned connectors with storing tarnish free practices, using anti tarnish wraps and long term containment measures to prevent tarnish. We’ll wrap, label, and seal components promptly, monitoring humidity to maintain corrosion resistance and extend life.
Conclusion
We’ve walked through clean, safe handling of charger connectors and terminals, from prep to post-clean checks. By using non-metallic tools, approved cleaners, and thorough inspections, we prevent resistance heating and intermittent charging. We reseat, test voltage, and document actions for traceability. Like tuning a precise instrument, disciplined maintenance keeps performance predictable. If you spot bent pins, corrosion you can’t remove, or inconsistent seating, don’t hesitate—seek replacement or professional help to protect charging reliability.

